I have been thinking about setting up my home photography studio for some time now, and so I did some research on the requirements and factors to consider, ranging from space-saving tricks to lighting setups. Whilst most of my lighting options will be built around the equipment that I have to hand, there is still a part of me that wonders if I will be required to get in touch with somewhere like this Sydney lighting installation company who can incorporate permanent lighting into other areas of the room to provide me with light when I’m not required to take photographs. Whilst I haven’t come to a definitive decision yet, it is definitely something worth considering once I have made progress with the space. My choice of creating a home photography studio means that I will avoid transporting large, heavy, and cumbersome equipment to a far-flung rented space. Still, I will be the boss of my shooting environment, and thus have total control over it. With such an environment, the chances of my business thriving will be very high.
The Setup
Before I buy any equipment for my home photography studio, the first thing to do is to set my goals. This will include a clear definition of my portfolio, as well as the type of gigs that I want to cover. Such clarity will crucially save time and money when setting up a home professional studio that will meet my needs.
For instance, if I desire to shoot Family photography, then I can’t set up the studio in my tiny bedroom space. This will require a bigger space within my home that I can easily tear down as I take the shots. But should I decide to focus on shooting small babies, then that won’t require much space.
Another important consideration is my style. If I want sunny and naturally lit photos, then I must ensure that my home studio has plenty of natural light, or acquire high-quality home studio lighting equipment. But if my portfolio contains dark and moody photos, then my setup should be able to shield out any unwanted lighting. Further to this, I will plan well for my electricity needs, ensuring that the chosen location has numerous reliable outlets. Overall, no matter what type of photography I wish to pursue, I think a space similar to a backyard studio shed might work well. That way, I can have a completely separate space that serves exclusively as a studio, and I can get it designed as I like taking all other factors into consideration.
Equipment
After choosing the space that best meets my home studio needs, the next task will be to source the equipment. Based on the market research, there is a wide range of equipment out there regardless of the budget I have. There should be some pieces of equipment that get prioritised over others, to ensure I have everything I need. This means outsourcing certain processes such as slide and negative scanning. Not only is the equipment for this process costly, but the equipment will also take up valuable space in my home set up.
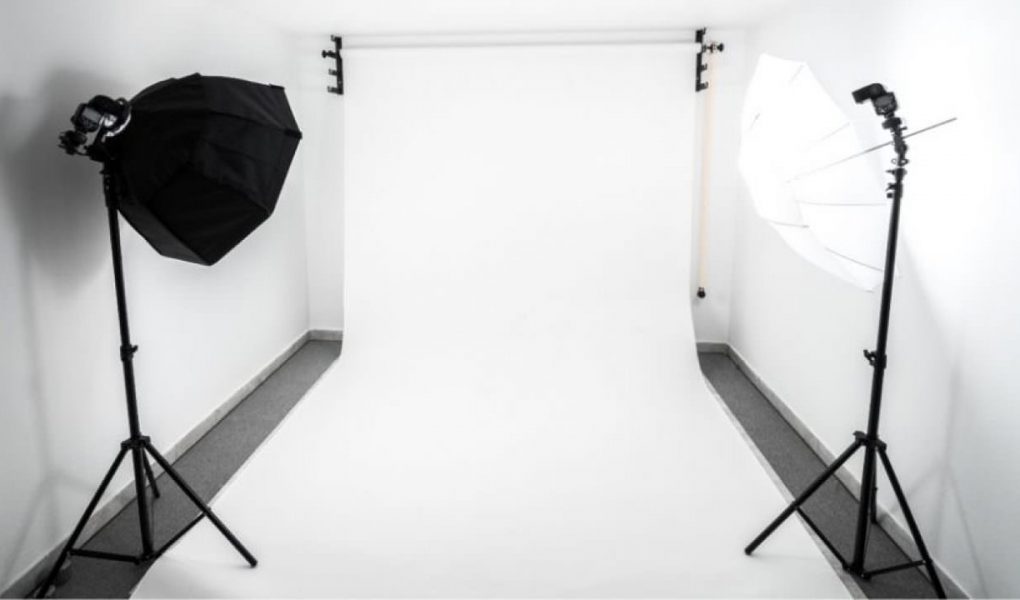
Home Studio Lighting Setup
First and foremost, your lighting needs to be on point if you are thinking of setting up a studio at home. It is one of the most vital pieces of equipment that I will prioritize when setting up a home photography studio. For a start, a light and an umbrella to serve as a reflector are enough. But as my business grows and breaks even, I will consider advancing the studio by adding two more lights for a three-point portrait lighting setup. Increased numbers and types of modifiers will help me create new effects to satisfy the various demands of my clients.
Studio Flashes
Flashes offer more powerful units. They come in handy if I want my images to be as sharp and clear as possible. Flashes also recycle faster than speedlights, making it easier to capture numerous little moments. Such advantages come in handy when I want to shoot bigger groups. Multiple shots increase my chances of getting the perfect shot captured in a modelling light.
Flashes are more costly than speedlights and are a key consideration when setting up a home photography studio.
Speedlights
Unlike flashes, speedlights are smaller and lighter than flashes. Flashes are ideal if the studio location is small, and I want to easily set up and dismantle them. Besides, with a low budget, I can get a wide range of options. However, with those advantages, they also have their drawbacks. They are less powerful than strobes, thus providing less illumination, thus forcing me to adjust my camera settings which might affect the sharpness of the images.
Light Stands
Light stands are vital. I will therefore allocate a substantial budget to them when setting up my home photography studio. A cheap light stand can be frustrating to use during a photoshoot, as they topple over and break the lights or cause injury.
Studio Backgrounds
Depending on my photography portfolio, I will ensure that I have various background options that I will apply for various types of shoots depending on the client’s needs. I will get a collapsible background that comes with the option of white or black. Also important is background support to support the collapsible background and other rolls that I will be using.
Modifiers
After acquiring all of the above equipment, I will need modifiers to take my shots to the next level. Some of these modifiers include metallic or white reflects, gels, umbrellas, and softboxes.